[GAS][Ui]チェックボックスを実装するには: 逆引きGoogle Apps Script
2012 年 4 月 17 日 火曜日

▼サンプルスクリプト
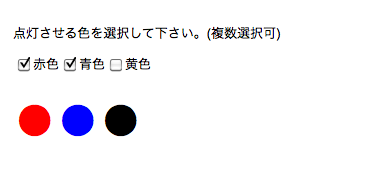
黒丸の文字を記述したラベルを「ライト」のように見せている。文字色が黒色の消灯状態で表示し、チェックボックスのON/OFFによってライトを点灯させている。
少し長いコードになるが、このサンプルスクリプトでは、チェックボックスへのクリックイベント追加方法、およびクリックイベントとバインドしたメソッドでチェック状態を取得する方法に注目していただきたい。
function doGet() {
var app = UiApp.createApplication();
var wrapper = app.createVerticalPanel();
var handler = app.createServerHandler('checkChanged_').addCallbackElement(wrapper);
//チェックボックスを作成
var checkboxContainer = app.createHorizontalPanel()
.add(app.createCheckBox('赤色').setName('redChecked').addClickHandler(handler))
.add(app.createCheckBox('青色').setName('blueChecked').addClickHandler(handler))
.add(app.createCheckBox('黄色').setName('yellowChecked').addClickHandler(handler));
//ライトを生成
var lightContainer = app.createHorizontalPanel()
.add(app.createLabel('●').setId('redLight').setStyleAttribute('fontSize','72px'))
.add(app.createLabel('●').setId('blueLight').setStyleAttribute('fontSize','72px'))
.add(app.createLabel('●').setId('yellowLight').setStyleAttribute('fontSize','72px'));
//チェックボックス、ラベルをレイアウトパネルに追加
wrapper
.add(app.createHTML('点灯させる色を選択して下さい。(複数選択可)
'))
.add(checkboxContainer)
.add(lightContainer);
app.add(wrapper);
return app;
}
function checkChanged_(e){
var app = UiApp.getActiveApplication();
if(e.parameter.redChecked=='true')
//『赤色』チェックON
app.getElementById('redLight').setStyleAttribute('color','red');
else
//『赤色』チェックOFF
app.getElementById('redLight').setStyleAttribute('color','black');
if(e.parameter.blueChecked=='true')
app.getElementById('blueLight').setStyleAttribute('color','blue');
else
app.getElementById('blueLight').setStyleAttribute('color','black');
if(e.parameter.yellowChecked=='true')
app.getElementById('yellowLight').setStyleAttribute('color','yellow');
else
app.getElementById('yellowLight').setStyleAttribute('color','black');
return app;
}
行2:Uiインスタンスを生成
行3:レイアウトパネル(ラッパー)を生成
行4:あらかじめサーバハンドラを定義し、行8-10で使いまわしている。createServerHandler()のパラメータにはバインドするメソッド名、addCallbackElement()のパラメータにはバインドするメソッドに受け渡すオブジェクトをセットする。
行7-10:{Uiインスタンス}.createCheckBoxでチェックボックスを生成している。続けて、各チェックボックスにName属性値と、行4で定義したクリックハンドラを追加している。
行8は、
というHTMLに展開される。
行13-16:ライト(に見せかけるための黒丸文字が記述されたラベル)を生成している。チェックボックスのチェックON/OFFイベントで色を変更する際に、getElementById()で対象を識別するために、.setId()により各ラベルにIDをふっている。
- 関連:ラベルを挿入するには
- 関連:CSSで装飾するには
行28:チェックボックスのクリックイベントとバインドするメソッドを定義。
行29:doGet()メソッド内で生成したUiオブジェクトをあらためて取得。
行31:行4でaddCallbackElement()によりメソッドcheckChanged_に受け渡したオブジェクトはwrapper。wrapperにはチェックボックスが含まれる。さらにチェックボックスにはそれぞれredChecked、blueChecked、yellowCheckedというName属性が設定されているので、それぞれ以下のように入力値を取り出すことが可能。
- 赤色チェックボックスの値:e.parameter.redChecked
- 青色チェックボックスの値:e.parameter.blueChecked
- 黄色チェックボックスの値:e.parameter.yellowChecked
チェックされている場合は”true”という文字列、チェックされていない場合は”false”という値が入る。getElementById()でIdからオブジェクトを取得し、取得したオブジェクトの文字色を変更している。
構文
createCheckBox()
createCheckBox(label)
createCheckBox(label, asHtml)
パラメータ
- {String}label
- チェックボックスのラベル
- {Boolean}asHtml
- ラベルをHTMLとして出力するかどうか
戻り値
- CheckBox
- 生成したチェックボックスオブジェクト。
公式ドキュメント
関連記事
コメントをどうぞ
トラックバック
このエントリーのトラックバックURL:
http://www.bmoo.net/archives/2012/04/314029.html/trackback
